Esper walks you through a step-by-step process to create your rulemaking.
Users are able to create new rulemaking according to their roles.

To create a rulemaking:
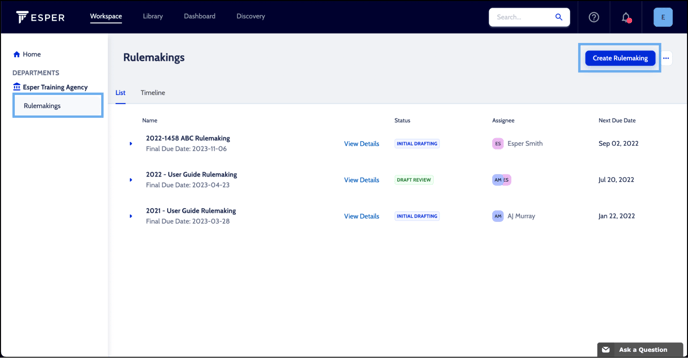
- From the Workspace, click the Rulemakings button under your agency name in the left-hand sidebar
- The Rulemakings List will appear, click the Create Rulemaking button on the top right.
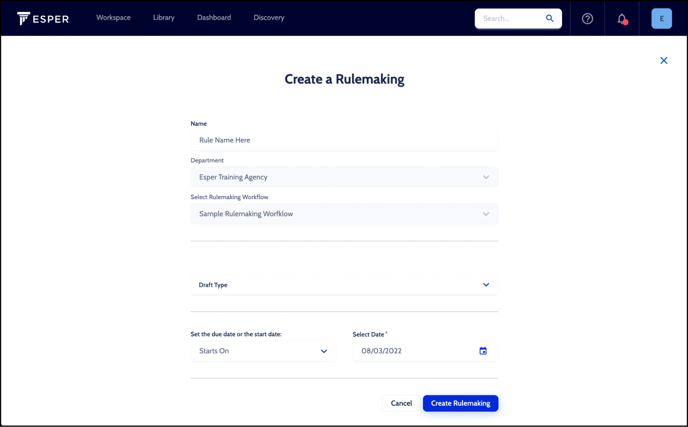
Name your Rulemaking
- Enter the rule name in the Name field
- If no default department is entered, select your department from the Department dropdown menu
- Select a workflow from the Rulemaking Workflow dropdown menu
- Click Save

Select Draft Type
Choose to Amend, Create, or Repeal Rule from the Draft Type dropdown.
- Select a draft type from the Draft Type dropdown menu
- Amend Rule or Repeal Rule
- Under Add rule(s), enter a citation number or rule name in the search field
- Click appropriate rule
- Continue searching and adding rules until all necessary rules have been added
- Use the + to add more than one rule at a time
- Click the Save button
- If necessary, click the + Add button to add another Draft Type
- Create Rule
- Enter the Rule Number and Rule Name
Note: If you do not know the new rule’s number and name upon creation, input New Rule for Rule Number and 1 for Rule Name - Select Chapter by typing the Chapter’s name or scrolling through the list of options. Chapters are listed numerically
Note: You must select a chapter. If you do not know the chapter for the new rule, choose one as a placeholder - To make a change to an entire Chapter, select to Amend, Create, or Repeal Chapter from the Draft Type dropdown
Note: You must also select to Amend, Create, or Repeal all the rules in the Chapter.
- Enter the Rule Number and Rule Name
Set Due or Start Date
- Select Starts On or Due On from the dropdown menu. Task due dates will be automatically calculated working forwards from a Starts On date or backwards from a Due On date
- Enter the appropriate date based on your selection above in the Date field
- Click the Create Rulemaking button
